Ever marveled at those stunning ceramic pieces adorned with intricate veins or lines of vibrant colors? Wonder no more, as we delve into the fascinating world of marbling – a simple yet captivating technique that breathes life into your ceramic creations.
Embarking on the journey of marbling may seem more involved than working with a single color, but fear not. The steps are surprisingly straightforward, making it an accessible and rewarding endeavor.
Join us on this blog as we unravel the mysteries of marbling. We’ll demystify what marbling truly entails, outline the essential materials you’ll need, and guide you through the step-by-step process to achieve the enchanting marbling effect that transforms ordinary objects into works of art.
What exactly is marbling?
Marbling, a meticulous decorative technique, mimics the luxurious appearance of marble on various objects. While commonly associated with handmade ceramics, this versatile method extends its influence beyond pottery, making its mark in the realms of gastronomy, such as embellishing cakes, and finding its place in the textile industry for creating unique clothing patterns.
In the realm of crafting clay pieces, marbling achieves its captivating allure by deftly incorporating an array of mixed clay colors. Alternatively, this striking effect can be accomplished by applying ceramic glazes to a single-colored clay or by introducing silicate oxides into the creative mix.
What truly sets marbling apart is the inherent diversity it brings to each piece. Unlike mass-produced items that lack individuality, marbled creations boast a distinct character. The nuances emerge through the intricate process of clay kneading, the formation of veins, their varying thickness, and the strategic sequencing of colors. This means that, even with identical figures and color schemes, no two marbled art pieces will ever be replicas – a testament to the unpredictable and alluring beauty that unfolds with every unique marbling endeavor.
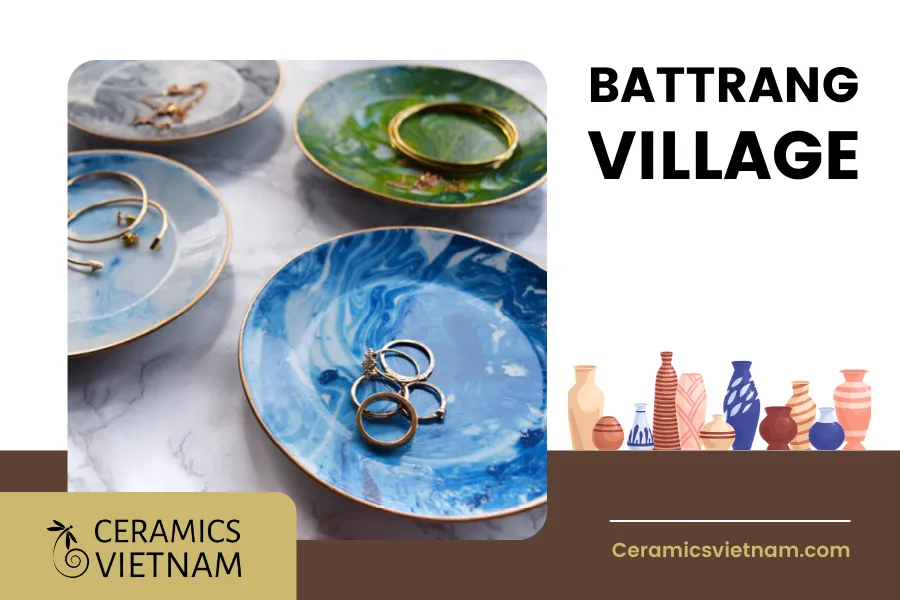
Marbled ceramics
Essential materials for marbling
Embarking on the marbling journey in ceramics involves not only creativity but also a set of essential materials to ensure a seamless and successful process. Let’s delve into the specifics of each item required for this captivating ceramic technique:
- Clay: Choose a high-quality clay suitable for pottery. The clay’s properties, such as texture and color, will significantly impact the final appearance of your marbled creations.
- Cutter: A sharp cutter or pottery tool is indispensable for shaping and cutting the clay. Ensure precision, especially when crafting intricate designs or details in your marbled patterns.
- Ceramic pigments (1 or 2 Colors): Opt for ceramic pigments in one or two colors to infuse vibrancy and depth into your marbled patterns. Consider experimenting with different pigment combinations to achieve the desired visual impact.
- Water sprayer: Maintain the right level of moisture during the marbling process by using a water sprayer. Consistent hydration is crucial for achieving optimal malleability and workability of the clay.
- Roller: A roller is an invaluable tool for even flattening and smoothing the clay. It ensures a uniform surface, providing the ideal canvas for your marbling Choose a roller that facilitates effortless and controlled application.
- Lance-tipped scalpel: Precision is paramount in marbling, and a lance-tipped scalpel allows you to refine details and create intricate veins or patterns with accuracy. This tool is essential for achieving fine lines and delicate features in your designs.
- Barbotine (Slip): Barbotine, or slip, serves as an adhesive and is vital for securely attaching pieces of clay together. It enhances cohesion during the marbling process, promoting the seamless integration of different colored elements.
- Ceramic kiln: Access to a ceramic kiln is indispensable for firing your marbled creations. The kiln ensures that the clay is properly cured, resulting in durable and long-lasting ceramic pieces. Familiarize yourself with the kiln’s settings to achieve the desired firing outcomes.
- Clear ceramic glaze: Finish your marbled masterpieces with a clear ceramic glaze. This final touch not only enhances the visual appeal but also provides a protective layer, adding durability and depth to the finished ceramics. Explore various glaze options to complement your marbling
By gathering these detailed materials, you set the stage for a comprehensive marbling experience, allowing you to explore the depths of creativity and produce stunning, one-of-a-kind ceramic pieces with intricate details and lasting beauty.
Step-by-step guide: Crafting a marbled ceramic pitcher
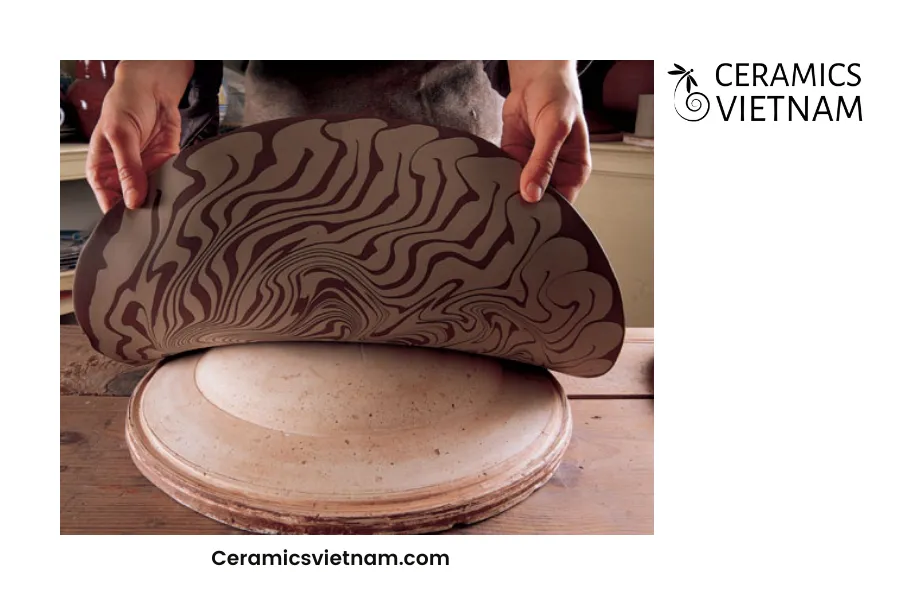
Crafting ceramics using the art of marbling
Step 1: Preparing the clay block
Begin by placing your clay block on the work table. Use a cutter to trim a piece of clay. Subsequently, thoroughly knead the clay to ensure optimal consistency for seamlessly blending colors in the later stages.
It’s crucial to knead the clay meticulously to eliminate any trapped air bubbles. During the firing process in the kiln, these bubbles could expand due to the heat, risking damage to both your artistic creation and any surrounding pieces.
Thorough kneading not only aids in color amalgamation but also serves as a preventive measure. By bursting air bubbles, you reduce the likelihood of imperfections in the final product caused by the explosive release of trapped air during the firing phase. This meticulous preparation sets the foundation for a flawless marbled pitcher.
Step 2: Dividing the clay for pigment application
Once the clay is well-kneaded, meticulously divide it into several pieces. This division is not just a logistical step; it sets the stage for the next critical phase where pigments will be applied to each layer, creating the distinctive veins synonymous with marbled ceramics.
Step 3: Creating pigment receptacles
Delicately create a hole in the center of each piece of clay earmarked for pigment application. This strategic placement ensures that when you knead the clay again, the pigments are evenly distributed, contributing to the marbling effect.
Step 4: Applying ceramic pigments
Now, introduce ceramic pigments into the holes. To facilitate a seamless blend, use a sprayer to lightly moisten the pigment powder. This step is pivotal in preventing the formation of lumps in the clay mass.
Step 5: Kneading for color fusion
Now, engage in the tactile process of kneading the clay with your fingers—pinch, create holes, and move the clay to ensure an even distribution of pigments. Expect your hands to be stained during this creative venture. If you relish the sensory experience and appreciate texture, feel free to forgo gloves. However, if you prefer to keep your hands clean, gloves are a practical option.
This kneading process should be repeated for each segmented piece of clay. For those aiming for a two-color piece, consider applying one color to some pieces and another to the rest. Alternatively, choose to paint only specific sections, allowing others to retain the natural color of the clay. This customization adds a layer of artistic freedom to your marbled ceramic creation.
Step 6: Crafting color layers for marbling effect
Once all your colored clay pieces or layers are prepared, skillfully shape them into a disk. Arrange these layers in a tower, alternating colors strategically.
To emphasize a particular color over others, such as creating a thicker grain, adjust the size of the clay layer for that specific color. For instance, enlarge and widen the layer of natural brown clay to make it more prominent, as illustrated in the accompanying image. This technique adds depth and visual interest to your marbled ceramic masterpiece.
Step 7: Intensive kneading for veins
Move into a phase of intensive kneading. This process replicates the initial steps and is necessary to create the veins and intricate patterns characteristic of marbled ceramics. Despite its time-consuming nature, the effort invested in this step is anticipated to yield visually striking results.
Step 8: Assessing the marbling effect
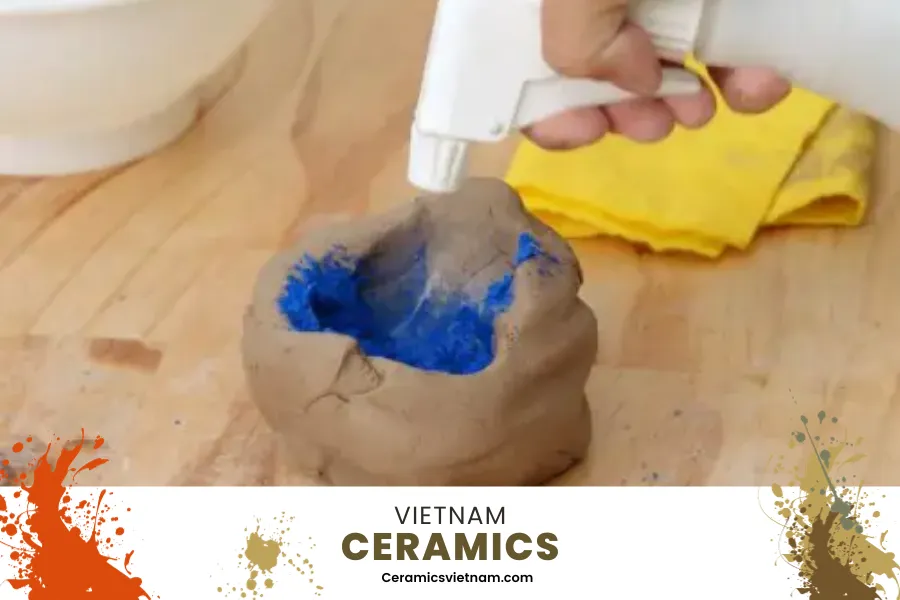
Step 4_ Applying ceramic pigments
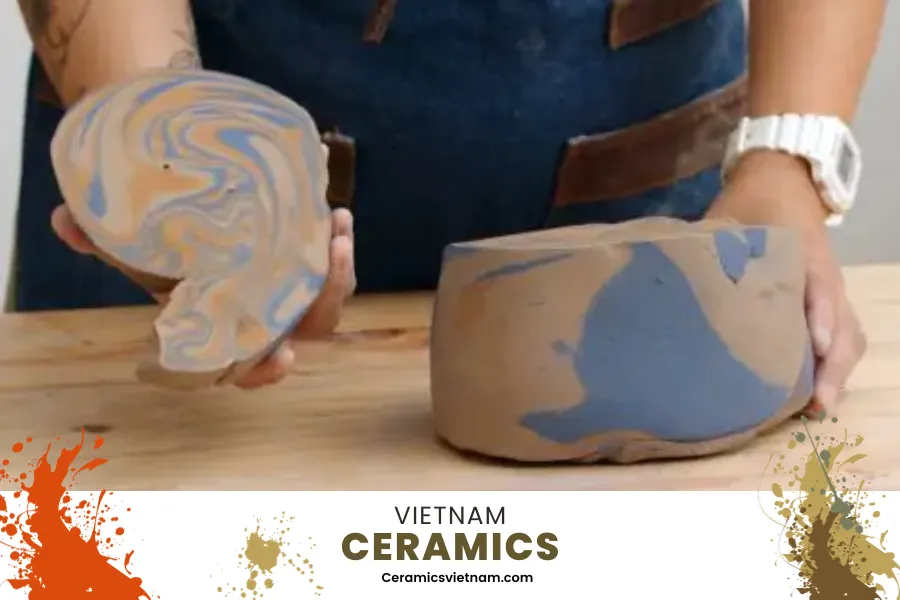
Step 8_ Assessing the marbling effect
After an extended period of kneading, it’s time to evaluate the marbling effect. Using the cutter, similar to the initial block-cutting step, carefully slice off a piece of clay. Examine the cross-section to ensure the presence of several well-distributed veins in multiple colors. A successful marbling effect, as illustrated in the image below, should showcase an intricate pattern with veins of three distinct colors—orange, blue, and the natural brown of the clay. This step confirms the success of your marbling technique before progressing further in the crafting process.
Step 9: Crafting the marbled jar
With the marbled clay now prepared, it’s time to embark on creating your jar. Ready for the challenge? You’ll be employing one of the simplest modeling techniques in the ceramics realm—the slab technique.
Begin by placing the marbled clay on a table. Using a roller, diligently flatten the clay until it forms a slab approximately half a centimeter thick. This sets the foundation for shaping your jar and allows for the unique marbling patterns to be prominently displayed in the final piece.
Step 10: Shaping the marbled jar components
Continuing the process, you’ll craft the entire piece using the slab you’ve created. Employ the lance-tip scalpel to carefully cut a circle, serving as the jar’s base. Simultaneously, cut a rectangle matching the circumference of the circle. This rectangle should encircle the base circle entirely, connecting at its ends to form the cylindrical body of the jar.
Additionally, create a small rectangle for the spout or mouth of the jar and a longer strip of clay to fashion the handle. These intricately cut components are pivotal in constructing the distinct features of your marbled ceramic jar.
Step 11: Assembling and joining components with barbotine
Now, it’s time to bring all the meticulously cut components together. Utilize barbotine, a liquid mixture of water and clay, as the bonding agent. Before application, make short incisions with the scalpel on each piece intended for joining. These incisions facilitate the seamless absorption of barbotine into the clay, ensuring a secure bond between the parts.
For instance, make cuts on the top edge of the circle (base of the jar) and the base of the rectangle (the jar walls). Apply barbotine on both cut surfaces and carefully unite them. Note that the rectangle should be positioned atop the circle, and its ends must be joined to form the cylindrical structure of the jar.
Before attaching the small rectangle for the spout, fashion a U shape by cutting the base of one of its long sides. Position it on the jar so that the U opening faces upwards and aligns with the jar’s top edge.
Regarding the handle, make cuts on both ends of the strip. Similar to the spout, cut the jar where you anticipate the handle’s attachment. Press each component together firmly, holding them in place for a few seconds. This step ensures a strong and lasting bond between the various parts of your marbled ceramic jar.
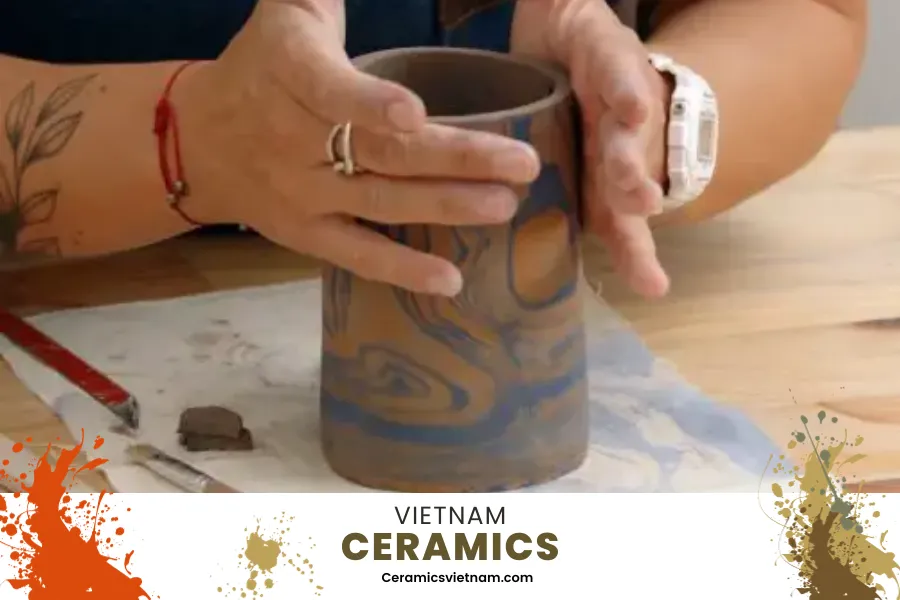
Step 11_ Assembling and joining components with barbotine
Step 12: Smoothing and blending joints
To seamlessly integrate the joints between the base and the jar walls, as well as the spout and handle with the walls, employ a technique to create a unified appearance. Moisten your fingers and gently run them along these joints. This process involves pulling the clay, visually transforming the interconnected parts into a cohesive and harmonious whole.
Such smoothing and blending are common practices in coiling modeling techniques, where pieces are constructed by layering clay coils. Alternatively, you can use a toothpick or a wet sponge to ensure the clay drags smoothly during this refining process. This step contributes to the aesthetic coherence of your marbled ceramic jar, providing a polished and professional finish.
Step 13: Perfecting the spout
Upon inspection, you may notice a crucial detail missing—the outlet for liquids. No need to fret; we’ve got it covered. To finalize the jar’s spout or mouth, use the scalpel to cut a section of the wall, aligning it with the previously placed spout.
Craft the cut into the same U-shape for consistency. If the cut lacks precision, don’t panic; you can refine it by moistening your fingers or using a sponge.
For an alternative and unique touch, consider another option for liquid drainage. Employ a small-tipped hole punch on the wall section containing the spout. This method involves drilling small holes through which liquids can be poured. This distinctive choice adds character to your piece, making it even more exceptional and functional.
Step 14: Firing
With your masterpiece ready, it’s time to subject it to the kiln’s transformative heat. Take your assembled piece to the kiln and let it undergo the firing process for a duration of 2 to 3 hours. The temperature during this phase should range between 800°C and 1,200°C. Refer to your clay manufacturer’s guidelines for precise instructions on time and temperature specifications.
After the designated hours have elapsed, carefully retrieve your jar from the kiln and allow it to cool. At this point, you have the option to leave your creation in its natural state without additional glaze, achieving a matte finish. However, for those desiring a glossy, waterproof, and more resilient appearance, we recommend applying a transparent glaze.
Ensure that the chosen glaze’s firing temperature aligns with that of the clay, taking into account the specific requirements of your clay type and ceramic glazes.
Step 15: Glazing
If you decide to add a glaze finish to your masterpiece, consider employing professional techniques such as pouring or dipping, widely favored by seasoned potters.
For this particular piece, the dipping technique is recommended. Prepare a container filled with your chosen glaze. With a pair of glazing tongs, submerge your ceramic creation into the glaze, ensuring complete coverage. Tweezers can be invaluable tools in this process, preventing any unwanted stains on your hands. Using your hands might lead to uneven glazing, leaving areas without the desired glazed finish.
Step 16: Second firing for optimal adhesion
As the glaze requires a second firing to adhere seamlessly to the ceramic surface, place your art piece back into the kiln for the second round. Ensure that the temperature and duration match those of the initial firing, adhering to the guidelines provided by your clay manufacturer. This meticulous process guarantees the perfect fusion of the glaze, enhancing both the aesthetic and functional qualities of your marbled ceramic jar.
Step 17: Unveiling your masterpiece
After the final firing, carefully retrieve your creation from the kiln. Allow it ample time to cool down before handling. Congratulations! You have successfully crafted a uniquely marbled jar, a testament to your artistic prowess and dedication.
Prepare to awe your family and friends at gatherings as you unveil your handcrafted pitcher to serve beverages. The distinctive marbling, personalized touch, and the story behind its creation will undoubtedly make your creation a conversation starter and a cherished addition to any occasion.
In conclusion, this blog aimed to guide you through the intricate process of crafting a marbled ceramic pitcher. Embrace the uniqueness of each piece and consider exploring other avenues in the world of ceramics. If you’re eager to continue learning, join our Ceramics Club for more insights, techniques, and enjoyable content. Happy crafting!
Read more


Leave a reply