The allure of marbled clay captured my attention the first time I laid eyes on it, sparking a curiosity about the intricate process behind its creation. The art of blending colors on pottery in such a beautiful way is truly captivating, prompting me to explore and share the various methods of making marbled pottery. Surprisingly, it’s a straightforward process.
Marbling pottery involves coloring the clay to create mesmerizing patterns. This can be achieved through the spinning motion of a pottery wheel or by hand-building a slab pot. Alternatively, you can opt for a marbled decorative effect on the pottery’s surface, utilizing underglaze or slip.
In this blog, I will delve into different techniques for making marbled pottery, allowing you to experiment and discover which method resonates most with you. Each technique caters to different preferences, so it’s worth exploring to find the one that brings you the most joy and yields the aesthetic effects you desire.
Marbling pottery on the wheel
When venturing into the realm of marbling pottery on the wheel, the key lies in using clay of at least two different colors. Acquiring this diverse palette is a step that can be approached in a couple of ways: purchasing pre-colored clays or crafting them yourself.
For those opting to buy different colored clays, a crucial consideration is ensuring their compatibility for mixing. Not all types of clay blend successfully, making it imperative to verify a few essential factors. Do these clays fire at the same temperature? Do they undergo shrinkage at a uniform rate? Is their moisture content consistent? The affirmative answer to these questions becomes paramount.
In instances where doubt creeps in, seeking guidance from your local ceramics store proves invaluable. They can offer insights into which clays can be safely blended, assuring a seamless and successful marbling process.
In certain creations, the color palette emanates from the natural hues of the distinct clay types utilized, bestowing a piece with a delightful natural and organic ambiance.
However, for those inclined towards a more vibrant and colorful outcome, the path forward involves the introduction of ceramic stains. This entails adding hues to the clay, allowing for a broader spectrum of colors to be infused into the marbled design. The artistry unfolds, and the wheel becomes a canvas for a rich, dynamic, and personalized expression in the realm of marbled pottery.
Making colored clay
The process of making colored clay is an artful exploration, infusing vibrancy into your pottery with the strategic blending of ceramic oxides or stains. This seemingly intricate task unfolds as a straightforward and rewarding endeavor, offering various avenues to achieve your desired results.
Commencing this creative journey, the choice of clay becomes paramount. Opt for a light-colored clay, such as white or tan/buff, ensuring a canvas where the stain’s hue can vividly manifest.
Next, the selection of a stain color marks a pivotal step. Here, you encounter the choice between utilizing oxides, powdered raw materials like iron oxide, or opting for ceramic stains. The latter, being processed oxides with additional stabilizing ingredients, presents a broader and more stable spectrum of colors. Among these, Mason Stains stand out as a popular choice, boasting a versatile range of hues.
With the foundation set, determine the quantity of clay you wish to color. Whether envisioning a 2 lbs batch or a different quantity, precision in weighing out this clay becomes fundamental. Subsequently, the powdered stain is weighed out, often as a percentage of the clay’s weight. The amount chosen dictates the intensity of the color, with a recommended starting point being around 8% of the clay’s weight. Adjustments may be necessary for paler-colored stains, ensuring a harmonious blend.
Once these meticulous measurements are in place, the integration of the stain into the clay beckons. Wedging becomes the conduit for this union, and there are multiple approaches to achieve this melding of elements.
In this detailed exploration of making colored clay, the intricacies of choosing, weighing, and blending unfold as essential steps in the artistic process. As you navigate this journey, your pottery takes on a new dimension, brimming with personalized hues and artistic expression.
Creating your colored clay for throwing
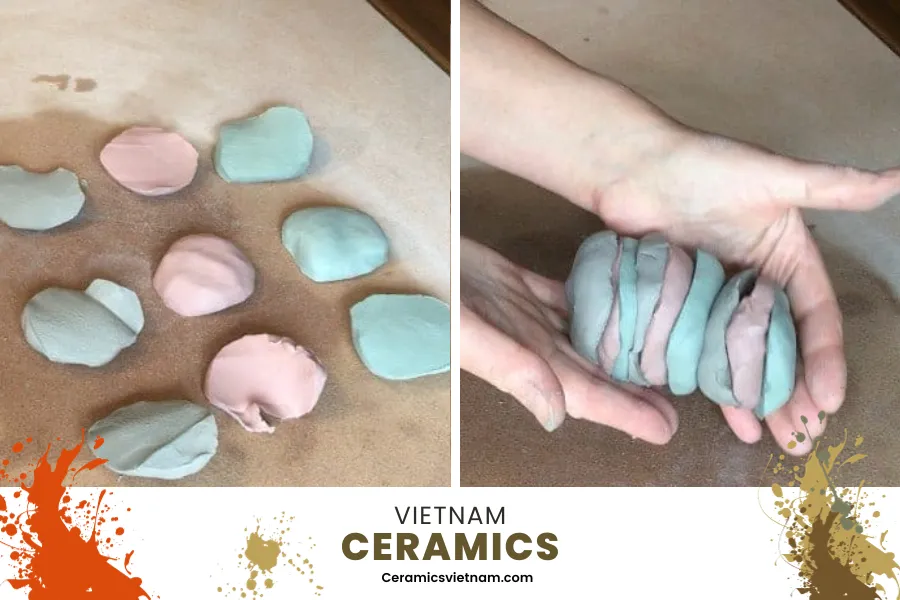
Creating your colored clay for throwing
Embarking on the artistic endeavor of crafting a marbled cup requires a careful and detailed preparation of colored clay. This step-by-step guide unveils the intricacies involved in assembling the elements for the forthcoming marbling process on the pottery wheel.
Commencing this journey, the selection of a vibrant palette of colored clay becomes the first stroke on the canvas of creativity. These hues should be chosen meticulously, aligning with the envisioned outcome of the marbling process.
The subsequent phase involves the delicate yet purposeful act of slicing off chunks of colored clay. These chunks are then transformed into balls, reminiscent of tangerines, and gently flattened. The emphasis here is on preserving the individual shapes and the integrity of each color.
Moving forward, each ball shape undergoes a sectional transformation, resembling cookies in their contours. Precision is achieved through the use of a clay wire cutter, ensuring uniformity in the sections.
Assembling these sections becomes an art form in itself, creating a stack of colors that dances in harmony. Alternating the hues purposefully enhances the visual impact, setting the stage for the marbled symphony.
To solidify this colorful assembly, a firm pat or slap is applied, ensuring a seamless fusion of the clay slices. The result is a cohesive unit, a ball-shaped representation of the creative fusion about to unfold.
Before the final act on the pottery wheel, the ball undergoes a few wedging maneuvers. This step is delicate, requiring just the right balance – three wedges suffice. This careful wedging maintains cohesion without compromising the distinctive color strata within the clay.
This meticulous preparation serves as the foundation, the canvas upon which the marbling exploration on the pottery wheel will unfold. Each step contributes to the complexity and vibrancy of the final creation, setting the stage for a captivating journey into the world of marbled pottery.
Crafting the perfect marbled pot
Embarking on the journey of throwing a marbled pot on the wheel involves mastering familiar techniques while incorporating nuanced adaptations to ensure the vibrancy of colored layers remains distinct throughout the creative process.
Initiating the process, centering the clay swiftly becomes paramount. The efficiency of this step is crucial; the more time spent centering, the greater the risk of blending the colored layers. Coning the clay up and down is a recommended method, limiting this motion to no more than twice. Once centered, proceed to throw the pot as per your usual technique.
Following the initial throw, the colors may appear somewhat muddy and unremarkable. The transformative moment comes when cleaning the slip off the exterior, revealing the true beauty of the marbled clay beneath.
To cleanse the slip from the exterior, utilize a rib tool by drawing it over the pot’s surface. Opting for a metal rib proves to be the most effective method in unveiling the intricate marbled pattern hidden beneath the surface.
When crafting a bowl, removing the slip from the interior is a more straightforward process. A curved metal rib aids in scraping off the slip, allowing the marbled clay to emerge.
The task becomes more intricate when dealing with cup interiors. Maneuvering a tool across the inside surface without gouging the clay poses a challenge.
To address this challenge, a sponge proves invaluable in removing as much slip as possible from the cup’s interior. The final touches to tidy up the inside are reserved for the trimming stage, ensuring a seamless and visually pleasing result.
Mastering the art of throwing a marbled pot involves a delicate balance of techniques, preserving the vibrant layers of color and revealing the beauty within. These steps ensure that each creation is not just a pot but a testament to the artistic fusion of form and color.
Perfecting your marbled pottery
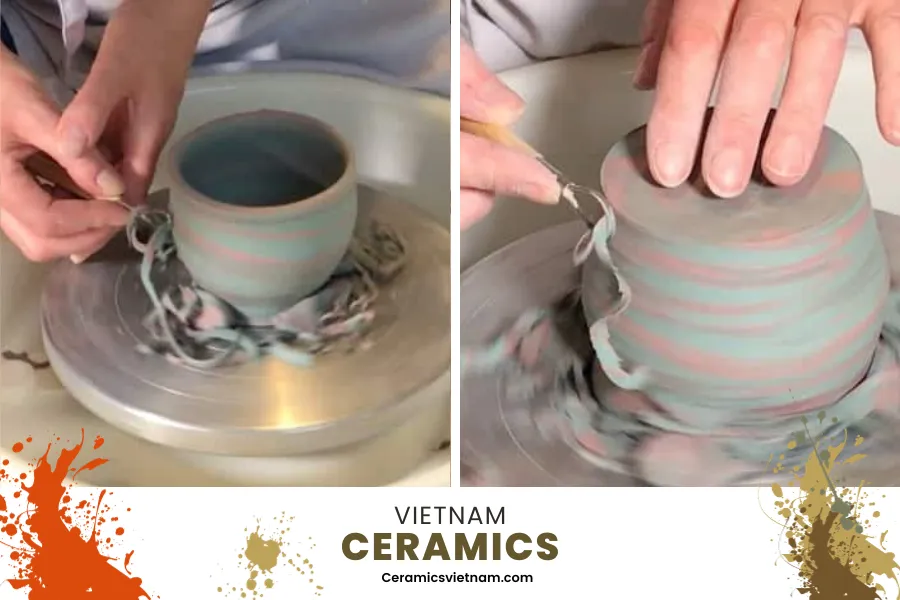
Perfecting your marbled pottery
As your pot or mug transitions to the leather-hard stage, a crucial step in the marbled pottery process unfolds — trimming. This meticulous process involves the removal of more slip, revealing the intricate marbled pattern beneath the surface.
For mugs, consider elevating your craftsmanship by fashioning a handle from matching marbled clay. To achieve this, begin by rolling out coils of the colored clay. Twist these coils together in a spiral pattern, creating one larger, fatter coil.
Next, bend the larger coil over, shaping it into a cone. This cone serves as the foundation for pulling a handle, much like you would for any mug handle.
Upon attaching the handle to the mug, the process requires attention to detail in tidying the slip. While this step may feel a bit fiddly, employing a variety of trimming tools becomes essential. These tools allow for precise scraping of the slip from the handle, ensuring a clean and polished appearance.
Once the handle is securely attached, and your pottery reaches the bone-dry stage, it’s time for the bisque firing. Marbled pottery finds its completion with the application of a clear glaze, adding a final touch of sheen and protection to your intricately crafted masterpiece.
Marbling pottery with hand building techniques
For those inclined towards hand-building their pottery, creating a marbled clay slab is a straightforward process that opens up a world of design possibilities. This slab can serve as the foundation for constructing pottery in various shapes and forms.
In this guide, I’ll walk you through the steps of utilizing your marbled clay slab with a hump or drape mold. However, it’s worth noting that this technique also integrates seamlessly with a slump mold, offering flexibility in your hand-building endeavors.
Just as in the wheel-throwing method, the first decision is whether to employ different colored clay bodies or opt for clay colored with Mason stains. Once you’ve made this choice and have the chosen clay at your disposal, the creation of your marbled clay slab can commence.
This hand-building approach allows you the freedom to sculpt your pottery as you envision it. Whether you’re crafting functional pieces or artistic forms, the marbled slab provides a unique canvas for your creativity to unfold. Explore the possibilities of hand-building with marbled clay, and let your imagination guide you in shaping distinctive and visually captivating pottery.
Approach 1: Crafting a Marbled Clay Slab
Several methods exist for creating a marbled clay slab, each yielding a slightly distinct marbling pattern in the clay.
Stack and slam marbling
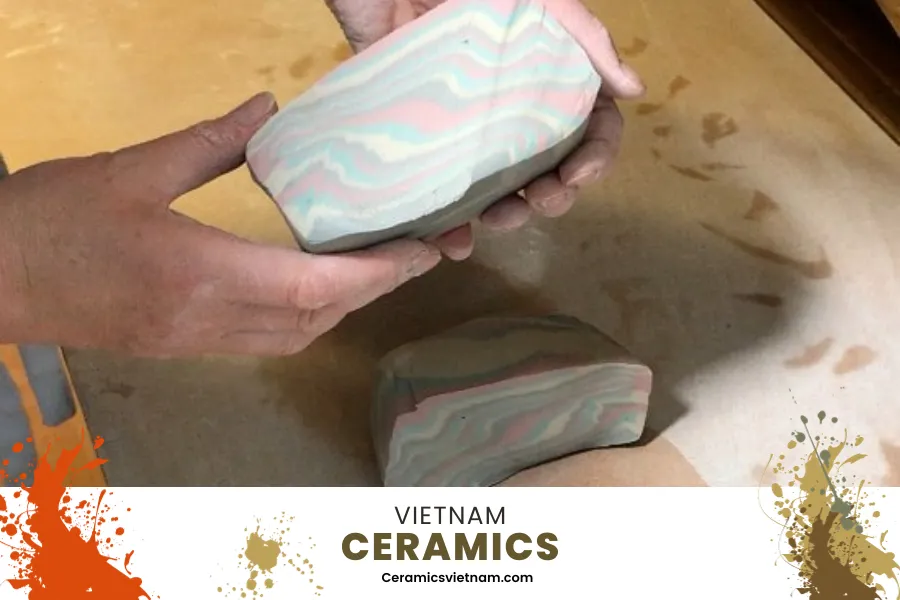
Stack and slam marbling
In the realm of clay crafting, the stack and slam marbling technique adds a dynamic and captivating touch to your creations. Inspired by the stack and slam wedging method, this approach introduces a unique method of achieving mesmerizing marbled patterns. Let’s delve into the detailed steps to master this technique and infuse your clay with vibrant, layered hues.
- Color selection and preparation: Commence your marbling journey by selecting two or more clay colors. Aim for sizes that are roughly equal or designate one as a base color and the others as accent colors. Shape the clay into oblong, loaf-shaped pieces using pressing, dropping, or rolling techniques.
- Slicing into sections: Precision is key as you slice each loaf-shaped piece into sections along its length, creating elongated sections with alternating colors. This initial step lays the foundation for the intricate layering that will define your marbled clay.
- Layering and pressing: Stack the color sections on top of each other, ensuring a thoughtful arrangement of alternating colors. The act of pressing the clay slabs together transforms them into a cohesive unit, setting the stage for the subsequent marbling magic.
- Initial slamming: Bring energy to your marbling process by dropping the stacked clay onto the wedging surface with a deliberate force. The repeated slamming, first on one side and then the other, initiates the blending of colors and prepares the clay for the next steps.
- Slicing and stacking again: With a wire cutter, delicately slice the clay into two sections. Stack these sections on top of one another and perform another round of slamming. This additional step not only binds the sections together but refines the layers, enhancing the intricacy of the marbled effect.
- Caution with thickness: Exercise caution as you progress, avoiding excessive repetitions that could result in overly thin layers. The goal is to maintain the distinct visibility of different colors. Monitor the thickness of the layers as you slice through, stopping when you sense the ideal balance.
Crafting a unique marbled clay bowl
Having honed the stack and slam marbling technique to perfection, the next step is transforming your marbled clay slab into a distinctive and visually stunning bowl. Let’s delve into the nuanced process that elevates your creation from a slab to a functional work of art.
Begin by rolling out the marbled clay slab, initiating the flattening process by gently pressing it down with your hand. The rolling pin becomes your artistic tool, allowing you to achieve the desired size and thickness that will set the stage for your bowl’s unique form.
With your marbled slab ready, carefully lift it and drape it over a chosen hump mold. The mold need not be extravagant; simplicity often enhances the natural beauty of the marbled clay. An inverted bowl or a handmade mold from plaster or bisque-fired clay serves the purpose.
Choosing the right mold is crucial. If you opt for an inverted bowl, ensure its base is completely smooth. Any patterns or foot rings might leave unintended indentations in your marbled clay. Now comes the artistic decision: shape the clay flush around the mold, or drape it more loosely to create a fluted edge with the marbled clay, adding a decorative touch to your bowl.
Once the clay reaches the leather-hard stage, carefully remove it from the mold. This stage marks the transition from formative shaping to refinement. Whether you’ve shaped the clay flush or created fluted edges, it’s time to trim the excess clay, paying attention to the details that will define the bowl’s ultimate shape.
As the bowl takes its final form, additional trimming and surface tidying become essential. This step refines the edges and ensures a polished appearance. The meticulous craftsmanship applied during these final stages transforms your marbled clay into a functional and aesthetically pleasing bowl.
Approach 2: Alternative marbled slab technique
If the stack and slam method doesn’t align with your preferences, here’s another straightforward approach to create a marbled slab. This technique was employed to craft the marbled bowl showcased below.
For this particular bowl, two distinct clay colors were utilized. Begin by shaping each color into blocks and wire cutting them into sliced sections.
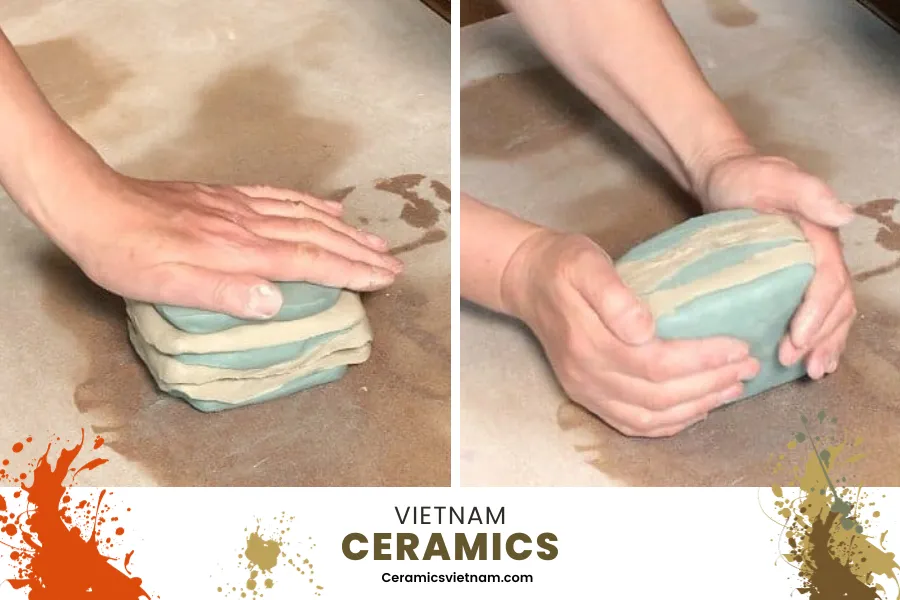
Alternative marbled slab technique
Similar to the stack and slam method, stack the clay slabs on top of each other, alternating between colors. Firmly pat them together or gently slam them on the table a few times until they adhere.
Next, commence the wedging process. Wedge the clay several times in one direction, around 5 or 6 times, observing the emergence of the marbled pattern. Rotate the clay and wedge it at a different angle, altering the direction of the marble pattern in a random manner. Repeat this wedging in the new direction 5 or 6 times. Exercise caution not to wedge for an extended period, as this may cause excessive blending of colors.
Finding the sweet spot in the wedging process is crucial for the most appealing marbled clay pattern. Experiment to determine when it feels right to stop wedging, as prolonged wedging can diminish the pattern’s definition.
Using the marbled clay slab to create a bowl
With the marbled clay pattern now perfected, it’s time to form your marbled slab. Utilize a roller to create the slab, following the aforementioned technique.
After rolling out the slab, gently tidy up and compress the clay using a rubber rib tool. This step is essential to avoid excessive color dragging.
Cut the clay into a tidier, more evenly shaped circle. Now, drape your marbled clay slab over a mold, as previously described. In this instance, the slab was draped over a plaster mold with fluted edges.
Once draped over the mold, use a rubber rib to tidy up the surface, smoothing and compressing the clay, particularly if there are small surface cracks.
When the clay reaches the leather-hard stage, it can be easily lifted off the mold. Trim the edges and smooth the inner surface with a rubber rib.
Afterward, proceed with bisque firing, followed by glaze firing using a clear glaze for a polished and finished appearance. This meticulous process ensures that your marbled clay creation transforms into a functional and aesthetically pleasing bowl.
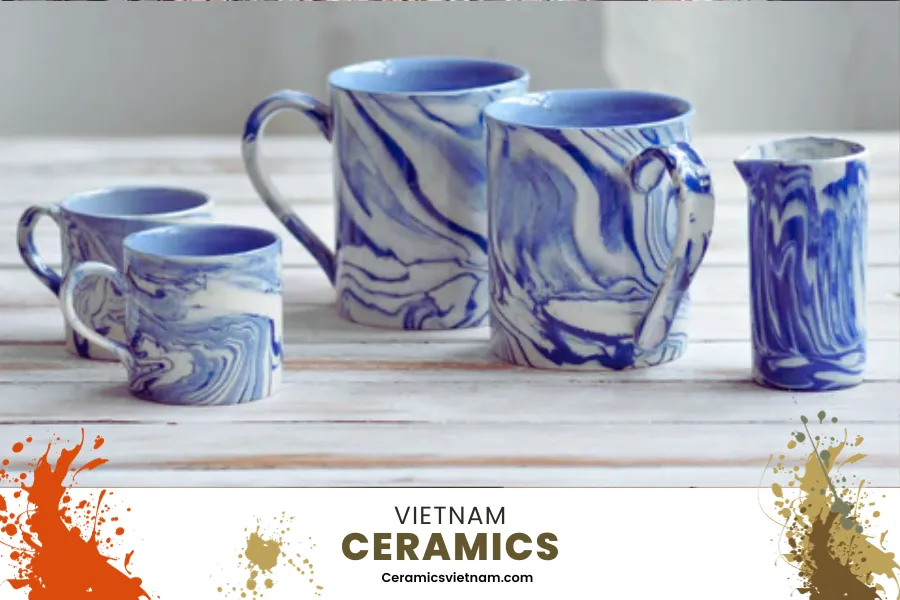
Marbling pottery with underglaze
Marbling pottery with underglaze
Unlocking the mesmerizing world of marbled pottery takes on an artistic twist with the use of an underglaze technique. This approach, though simple, unveils stunning results, as exemplified by the creation of this exquisite marbled bowl.
To embark on this creative journey, begin by preparing your workspace. Cover it meticulously with a plastic sheet, setting the stage for the forthcoming masterpiece. Spritz the shaving foam directly onto the plastic, creating a smooth and even layer. Employ any handy implement, such as a ruler, spatula, or rib tool, to spread the foam with finesse.
With your underglaze colors at the ready, drip them onto the shaving foam canvas. While a single color can make a statement, the true allure often lies in a well-curated selection of hues. Drip the diverse underglaze colors evenly onto the foam, setting the stage for the magic that follows.
In crafting your marbled pattern, choose a modeling tool with a narrow tip. However, caution against opting for something too thin; a needle tool or toothpick may not yield the desired effect. For larger pieces like cups, bowls, or vases, the pointed end of a wooden tool proves most effective.
Once satisfied with your underglaze masterpiece, delicately roll your bisqueware over the foam’s surface. No need for excessive pressure; a light skim allows the bisque to capture a harmonious blend of foam and glaze.
Having covered the desired surface area, proceed to rinse your creation under a tap. This simple yet crucial step removes the shaving foam, leaving behind the enchanting underglaze-marbled pattern on your bisqueware. The final touch involves firing your creation with a clear glaze, enhancing and preserving the allure of your unique marbled pottery.
Marbling pottery with slip
One of my preferred methods for adorning pottery involves the artful use of colored slip, offering a straightforward yet captivating technique to craft a visually striking marbled clay pattern.
To embark on the journey of creating marbled pottery, the initial step is to shape a piece of pottery using your preferred method. However, it’s crucial that the base of the piece maintains a relatively flat profile.
In this illustrative example, I opted for a pair of wheel-thrown plates. Once my plate reached the leather-hard stage, I delved into the creative process by painting the upper surface with decorating slip. While this step is optional, it provides an opportunity to align the main marbled color with the side of the plate. Feel free to skip this step if you prefer a different approach.
The intentional choice to match the main marble color with the plate’s side adds a touch of cohesion to the overall design. It’s advisable to exercise patience and wait until the base coat of slip also attains a leather-hard consistency before proceeding with the next steps in your pottery creation.
How to make marbled pottery with slip?
How to make marbled pottery with slip
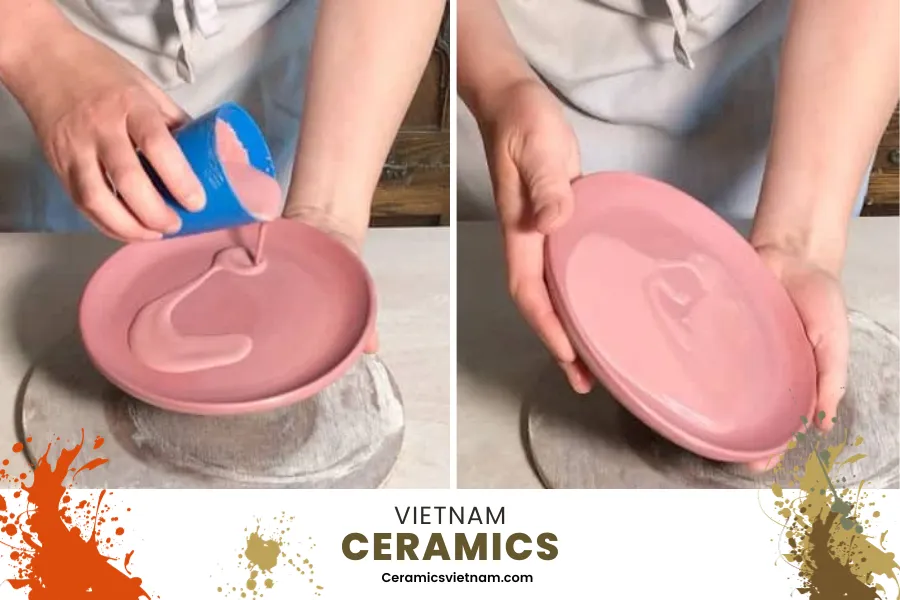
Creating a stunning marbled effect on your pottery through the art of decorative slip involves a thoughtful and detailed process. Begin by pouring a small quantity of colored decorating slip onto the flat base of your pottery, ensuring the slip’s consistency resembles single-pouring cream. This initial step lays the foundation for the intricate marbled pattern.
To avoid potential issues with the slip solidifying prematurely, especially if your pottery is quite leather-hard, preemptively paint a thin coat of decorating slip on the plate’s surface before marbling. This ensures that the slip retains adequate moisture for the subsequent steps.
The quantity of slip you use depends on the size of your pottery, with the goal of achieving a layer around 2mm thick. Gently rotate the pottery to evenly cover the bottom with the liquid slip. This serves as the canvas for the upcoming marbled masterpiece.
Now comes the exciting part – adding different colored slip to create the marbled pattern. Utilize a spoon or slip trailer to apply dots and lines of various colored slips onto the liquid slip layer. Experiment with multiple colors for a more dynamic and visually appealing result.
To bring the marbled pattern to life, lift the pottery and tilt it slowly. This movement encourages the liquid slip to flow, creating a mesmerizing and intricate design. For an added touch of randomness, give the pottery a gentle wiggle and shake, allowing the colors to interact organically.
These meticulous steps, when executed with care, will elevate your pottery marbling technique, resulting in unique and visually captivating pieces. Each creation tells a story of creativity and craftsmanship, showcasing the beauty of marbled pottery with decorative slip.
Pro Tip: In case you find that there’s an excess of slip gathered at the base of your pottery, you can manage this by carefully pouring out the surplus. Tilt the piece at an angle and allow the excess slip to drain out.
Now, when it comes to the slip markings on the side of your piece, you have options. You may choose to embrace them as a distinctive feature of the pottery, highlighting the natural flow of the marbling process. Alternatively, if you prefer a neater finish, delicately wipe off the slip from the side of your piece. To seamlessly blend any areas affected during this cleanup, reapply some of the base slip you initially used before marbling.
Once content with the marbled pattern and the desired slip effects, you can proceed with further steps in the pottery-making process.
Here, I’ve shared a glimpse of the marbling pottery techniques I personally enjoy. There are numerous variations and possibilities within these methods. The key is to explore and experiment with these techniques to discover which resonates with you the most. The beauty of marbling clay lies in its versatility—you can achieve diverse effects by playing with different colors. I encourage you to have fun and embrace the creative experimentation process!
Read more


Leave a reply